How to complete Chapter 8 All the Time in the World in 007 First Light

All the Time in the World is the eighth chapter in 007 First Light. This mission takes Bond to Slovakia, where he tracks a mysterious blond man during a chess tournament.
If you're stuck on any objective, here's a complete walkthrough covering every major step.
How to complete Chapter 8 All the Time in the World in 007 First Light
Drive to the hotel

The chapter begins immediately after A Matter of Considerable Delicacy. Once the opening cutscene ends, continue driving forward until you spot the hotel banner.
Take the road on the left and enter through the hotel gate. Continue ahead until you reach the hotel. After dropping off your teammates, follow the objective marker and park in the designated parking area.
How to complete Chapter 1 Against the Odds in 007 First Light
Investigate the blond man
After another cutscene, your goal is to follow the blond man into the hotel. Use the nearby stairs to reach the upper level and follow him toward the entrance. Unfortunately, Bond cannot enter because he lacks the required ID.
To find one, return to the middle level using the stairs. Head right and check one of the flower pots. The ID is hidden inside.
Once you have it, return to the security checkpoint and show the ID to gain access.
Reach the tournament area
After entering the hotel, take the stairs upward and head left through the hallway.
Continue through the corridor, make two left turns, and open the door leading outside. Walk toward the balcony to trigger a cutscene.
Search the hotel and eavesdrop at reception

Leave the balcony area and head downstairs until you reach the reception desk. Use the Eavesdrop prompt to listen to the conversation between a guest and a hotel employee.
After the conversation ends, speak with Mr. Prendergast. He reveals that the blond man recently went toward the laundry area.
Obtain the Staff key
The first key you need is carried by a security guard near reception. Look behind him and activate the vacuum cleaner. When he walks over to investigate, sneak behind him and steal the Staff key.
Obtain the Cellar key
From reception, take the path on the left and enter the Study. Avoid walking straight ahead because your teammates will spot you.
Inside the Study, use the Eavesdrop prompt to learn about the Cellar key. Once the conversation finishes, the male staff member carrying the key will move away. Turn on the vacuum cleaner in the nearby room to distract him, then steal the Cellar key.
Reach the laundry
Leave the Study and use the Staff key to enter the Staff-only area. Move through the opening, vault over the boxes, and unlock the next door using the Cellar key.
Continue forward and go downstairs to reach the laundry section, where the blond man is located.
Clear the laundry area

After the cutscene, move into cover and wait for the workers to finish talking. Turn on the vacuum cleaner to lure one worker toward your position. Sneak behind him and perform a silent takedown.
Return to the previous cover area and use the trolley to eliminate the second worker. Continue deeper into the laundry and listen to another conversation that mentions a Chauffeur Hat.
Wait until one worker stands near the trolley path and the second worker moves away. Push the trolley to take out the closer target.
Use the Q-watch to overload the nearby air conditioner and create smoke. Rush toward the remaining worker and eliminate him. Afterward, pick up the Chauffeur Hat and wear it as a disguise.
Follow the objective marker
With the disguise equipped, move toward the marked location without raising suspicion. Read the note on the nearby table and flip it over to learn about room 206. Kick open the nearby door, head outside, and exit through the window.
Return to the chess tournament
Climb the pipe outside and enter through the window above. Two guards will approach from the right side, so stay hidden and move left using cover.
Hide behind the table near the main door and use a gadget to break the knight statue beside the guard. When he investigates the noise, sneak up and perform a takedown. Open the door and speak with Monroe.
Search room 206

Take the stairs beside Monroe and head up to the floor containing room 206. A guard blocks the route, so activate the nearby vacuum cleaner to distract him.
Move toward room 206, but you'll discover that the room cannot be entered directly. Instead, distract the female staff member with another vacuum cleaner and steal the room 205 keycard.
Use the keycard to enter room 205. Go into the bathroom, climb out through the window, and move left across the ledge. This path leads directly into room 206 through its window.
Investigate room 206
Inside room 206, inspect the following items:
- Wallet near the fireplace.
- Keycard holder beside the bed.
- Suit inside the bathroom.
After speaking with Monroe, open the main door to trigger another cutscene.
Pursue the blond man
Exit through the nearby window and use the pipe to reach the level below. Move through the building and enter a restricted area.
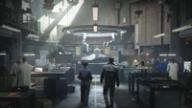
Go outside through another window and look over the edge to spot the blond man. Reach the ground level and run through the kitchen area.
Continue chasing him through multiple rooms and hallways. Eventually, you'll reach a locked gate.
Climb the nearby boxes, move around the obstacle, go upstairs, and kick open the next door. Follow the route into a crowded area and reach the white door on the far side.
Solve the fireplace puzzle
Inside the dining room, interact with the fireplace.
To open the hidden passage, press the symbols in this order:
- Goat
- Snake
- Lion
A secret path will appear behind the fireplace.
Explore the secret passage

Move through the newly opened tunnel and continue forward. Vault over obstacles, squeeze through gaps, and push the storage box blocking the route.
Eventually, you'll reach a lever. Pull it to trigger a cutscene.
Defeat the blond man
The blond man attacks Bond in a hand-to-hand fight.
Focus on parrying yellow attacks whenever they appear.
Use grabs regularly and keep pressure on him throughout the fight.
The battle takes several rounds, but good timing makes it fairly straightforward.
Defeat the twin brothers
After reaching the bomb room, Bond discovers the blond man is actually a pair of twins.
This fight is significantly tougher.
Keep parrying whenever either brother attacks, even during your own combo animations.
Use gadgets whenever possible to create openings and reduce pressure.
Defeating both brothers will trigger the next sequence.
Defuse the bomb
Once the fight ends, Bond attempts to defuse the bomb.
The outcome remains the same regardless of which options you choose.
One successful selection sequence is:
- Motherboard
- Battery
- Wires
- Green
- Red
Pursue 009
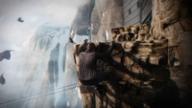
After recovering, climb the nearby platform and chase 009. He eventually escapes in a vehicle, forcing Bond into a car chase.
Stay close to 009's vehicle and use shortcuts whenever they appear. Avoid crashing heavily into oncoming traffic, as doing so can fail the mission.
Catch the plane

Move through the area while eliminating enemies. Use Focus mode to improve accuracy and conserve ammunition.
Shoot explosive objects and fuel containers whenever possible to damage multiple enemies at once. Keep advancing toward the aircraft.
When the plane begins moving, sprint toward the marked cable and use it to continue the pursuit. Bond will automatically transition into a vehicle sequence leading to the aircraft.
Board the plane
After reaching the aircraft, fight two enemies on top of the plane. Defeat another enemy firing at Bond and enter the aircraft interior.
Locate 009
Drop into the lower section of the plane and silently eliminate the nearby guard. Use the Override prompt on the flight controls.
You can now tilt the aircraft left and right. Whenever enemies begin shooting, tilt the plane to throw them off balance and expose them to attacks. Pick up weapons from defeated enemies and continue clearing the aircraft.
Reach the cockpit and escape
Continue forward until you reach the cockpit. A cutscene follows, sending Bond falling through the sky.
Avoid obstacles while descending and complete the final quick-time event to grab a parachute. This completes Chapter 8, All the Time in the World, and unlocks the next mission, Out of the Ashes.
How to complete Chapter 6 A Night Out in 007 First Light
Want to be the best? Upgrade your gaming setup
If you’re looking to upgrade your gaming setup, here are some of our top gear picks that combine performance, reliability, and great value:


As an Amazon Associate, we earn from qualifying purchases.